Difference between revisions of "Layout"
From MTG Wiki
(Updated per design training) |
(→Creating a layout) |
||
| (One intermediate revision by the same user not shown) | |||
| Line 7: | Line 7: | ||
==Creating a layout== | ==Creating a layout== | ||
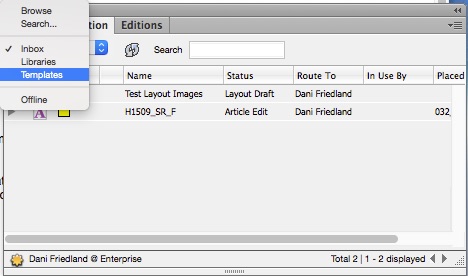
#Open InDesign and log into Smart Connection. Use the drop-down in the Smart Connection window to select "Templates". [[File:templates.jpg]] | #Open InDesign and log into Smart Connection. Use the drop-down in the Smart Connection window to select "Templates". [[File:templates.jpg]] | ||
| − | #Double-click the appropriate template to create a new layout. The template is made up of elements (which are called [[Components]] in Enterprise). | + | #Double-click the appropriate template to create a new layout. The template is made up of elements (which are called [[Component|Components]] in Enterprise). |
#From the Smart Connection menu, select "Save As...". Name the layout using the following naming convention: three-digit page number_issue shortcode (ex., H1510)_Story (ex., Products). Select the appropriate print category and ensure that the layout is in the right [[dossier]]. | #From the Smart Connection menu, select "Save As...". Name the layout using the following naming convention: three-digit page number_issue shortcode (ex., H1510)_Story (ex., Products). Select the appropriate print category and ensure that the layout is in the right [[dossier]]. | ||
#Paginate the story as normal, using the Pages panel in InDesign. | #Paginate the story as normal, using the Pages panel in InDesign. | ||
| Line 18: | Line 18: | ||
#Don't forget to [[logging off|log out]] via the Smart Connection menu before quitting InDesign. | #Don't forget to [[logging off|log out]] via the Smart Connection menu before quitting InDesign. | ||
| − | =Saving while working in InDesign== | + | ==Saving while working in InDesign== |
*The regular save (command-s) will save locally on your hard drive. | *The regular save (command-s) will save locally on your hard drive. | ||
*Save a version (from the Smart Connection menu) saves to the server. | *Save a version (from the Smart Connection menu) saves to the server. | ||
Latest revision as of 21:06, 20 January 2016
An article that has been processed by the art department becomes a layout, which includes all relevant article components as well as any art or other files placed in a given dossier.
A layout has files (such as images or articles) placed with in. These can be viewed by clicking the arrow next to the layout's icon.
Layouts have the following icon in Content Station and Smart Connection: ![]()
Contents
Creating a layout
- Open InDesign and log into Smart Connection. Use the drop-down in the Smart Connection window to select "Templates".

- Double-click the appropriate template to create a new layout. The template is made up of elements (which are called Components in Enterprise).
- From the Smart Connection menu, select "Save As...". Name the layout using the following naming convention: three-digit page number_issue shortcode (ex., H1510)_Story (ex., Products). Select the appropriate print category and ensure that the layout is in the right dossier.
- Paginate the story as normal, using the Pages panel in InDesign.
- In the Smart Connection window, navigate to the dossier for the story. (Right-click on the article file and select "Show dossier" to access the images and the rest of the story package.) The story will likely have multiple individual articles in the dossier; clicking the arrow next to each will show the individual components with that article.
- Drag the article anywhere on the page. If the component names match the element labels in InDesign (which they should), the system will automatically divide the article into the right elements. If necessary, select individual components and drag them onto the appropriate box. A link icon will show that a component has already been placed. If you delete an element, you'll need to relink the component by dragging and dropping it again.
- Cut the contents of the eyebrow. Paste into the appropriate spot on the master page, which is accessible via Pages.
- Drag in images from the dossier and lay out as usual.
- From the Smart Connection menu, select "Check In...". The status will be "layout draft" until it is ready to go back to editorial.
- Select all of the articles in the layout and set the routing to the blank option at the top of the list. This will remove the articles from the designers' inboxes.
- Don't forget to log out via the Smart Connection menu before quitting InDesign.
Saving while working in InDesign
- The regular save (command-s) will save locally on your hard drive.
- Save a version (from the Smart Connection menu) saves to the server.
- Check in (also from the Smart Connection menu) saves to the server and closes the file.
What is WoodWing Software doing with my layout?
Immediately after checking in a layout, the user called "WoodWing Software" will check it out very briefly. This is part of an automated process that updates Publication Overview.